


The 0DTE long butterfly is one of the most misunderstood strategies in options trading. For decades, traders have been taught to use it as a market-neutral strategy — place it at the money, collect premium, and hope price stays pinned. But that approach has a fundamental problem: the risk-to-reward ratio simply doesn’t work.
In this guide, we break down the 0DTE long butterfly spread as a directional strategy — the way it was meant to be traded. We’ll cover how it’s constructed, why symmetrical wings matter, how to select your spread width, and the entry rules that produce a 1:9 risk-to-reward ratio on SPX.
What Is a Long Butterfly Spread?
A long butterfly is an options strategy made up of two vertical spreads — a bull spread and a bear spread — that share a common short strike. When you plot the risk graph, it looks like a pyramid with feet. Some traders say it resembles the lower half of a butterfly, which is where the name comes from.
Here are the basics:
- Construction: Four contracts across three strikes, all with the same expiration date
- Type: Can be built with all calls (long call butterfly) or all puts (long put butterfly)
- Cost: Entered as a debit — you pay to put it on
- Risk: Fixed and defined at entry
- Profit: Capped, with max profit occurring at the short strike at expiration
A symmetrical butterfly means both wings have equal width. If your bull spread is 20 points wide, your bear spread is also 20 points wide. This is an important distinction, and we’ll come back to why symmetry matters.
Why Market-Neutral 0DTE Long Butterfly Setups Fail
Most educational resources teach the butterfly as a market-neutral strategy. Place the short strike at the current market price, and you profit if price stays near that level through expiration.
The issue is straightforward: when you place a butterfly at the money, the risk is often larger than the reward. In the same way that an at-the-money iron condor has an unfavorable risk profile, an at-the-money butterfly on a 0DTE day gives you a narrow profit zone and a risk-to-reward ratio that might be 1:1 or even worse.
Although the premium collection from an ATM butterfly can look attractive on paper, the narrow base you’re working with makes it a losing proposition over time. The math just doesn’t support it as a repeatable strategy.
The 0DTE Long Butterfly as a Directional Strategy
The solution is to push the butterfly out of the money.
Instead of placing your short strike at the current market price, you move the entire structure in the direction of your expected move. This fundamentally changes the risk-to-reward equation:
- At the money: Risk is large, reward is small — often 1:1 or worse
- Out of the money: Risk is small (just the debit paid), reward is large — targeting 1:9
When you buy an OTM butterfly, you’re paying a small debit for the chance at a much larger payout if price moves to your target area by expiration. Your maximum loss is limited to what you paid. This is the structure that makes the 0DTE long butterfly viable as a day trading strategy.
Why Symmetrical Wings, Not Broken Wings
A common question: why not use asymmetric (broken-wing) butterflies? With unequal wing widths, you can reduce risk on one side and increase the risk-to-reward ratio on paper.
There are two problems with this approach for 0DTE trading:
1. The distant risk is real. With a broken-wing butterfly, you shift the risk further out on one side. That looks safe — until price moves there. On a zero-day expiration, large moves happen, and concentrating your risk at a distant strike doesn’t eliminate it.
2. The profit curve works against you. Inside a broken-wing butterfly, the profit curve falls away from you in a way that isn’t conducive to day trading. A symmetrical butterfly gives you a clean, predictable profit curve. A broken-wing does not.
Symmetrical wings keep the structure honest. Equal risk on both sides, predictable behavior in between.
How to Calculate 0DTE Long Butterfly Max Profit
The max profit formula for a long butterfly is simple:
Max Profit = (Width × 100) − Debit Paid
The width is the distance in points between your long strike and your short strike. You multiply by 100 because each options contract represents 100 shares (or in the case of SPX, the $100 multiplier).
Worked Example
Take a 20-wide butterfly with a $200 debit:
- Width = 20 points
- Notional value = 20 × $100 = $2,000
- Debit paid = $200
- Max Profit = $2,000 − $200 = $1,800
To find the risk-to-reward ratio, divide the max profit by the debit:
- Risk-to-Reward = $1,800 ÷ $200 = 9:1
That’s the target: a 1:9 risk-to-reward ratio, where you risk $1 to potentially make $9.
Entry Rules for the 0DTE Long Butterfly
These are the foundational rules for entering a 0DTE butterfly on SPX:
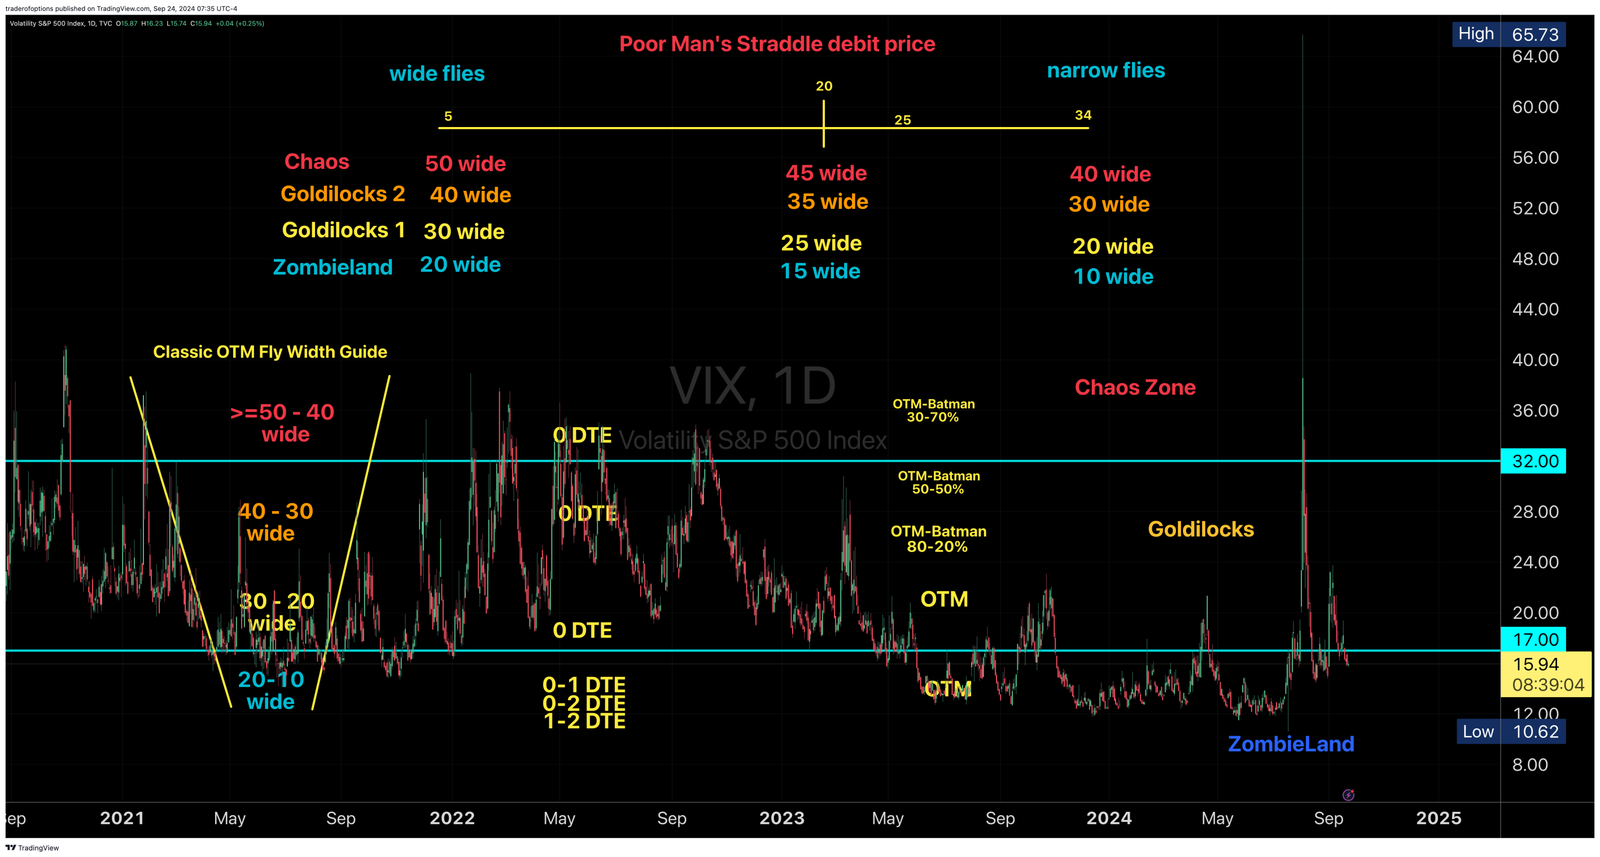
1. Buy a 15 to 30 Wide Long Butterfly
The spread width determines your profit zone and your cost. Wider butterflies cost more but give you a larger target area. A 15- to 30-point width on SPX is the working range for 0DTE.
2. Enter Soon After the Market Opens
Time is the most precious resource on a zero-day expiration. The earlier you enter, the cheaper the butterfly (in relative terms) and the more time you have for price to move toward your target.
3. Select a Directional Bias
You need a view on direction. One approach is the 50-day EMA:
- Price above the 50 EMA → Bullish bias → Buy a long call butterfly
- Price below the 50 EMA → Bearish bias → Buy a long put butterfly
By convention, we use call butterflies for bullish setups and put butterflies for bearish setups. In practice, a long call butterfly and a long put butterfly with the same strikes will produce identical risk and reward profiles. The distinction is mainly about liquidity — a deeply out-of-the-money call butterfly in a bearish setup might have wider bid-ask spreads. On SPX, this is rarely an issue, but convention keeps things clean.
4. Buy Out of the Money with a 1:9 Risk-to-Reward
This is the key rule. The debit you pay should be approximately one-tenth of the spread width (in dollar terms).
- 20-wide butterfly → Target a $200 debit (or less)
- 25-wide butterfly → Target a $250 debit (or less)
- 30-wide butterfly → Target a $300 debit (or less)
If you can’t get a 1:9 risk-to-reward, the setup isn’t there. Move on.
Long Butterfly vs Iron Butterfly
You’ll sometimes hear about the iron butterfly as an alternative. Here’s what you need to know:
An iron butterfly is constructed differently — it uses a short call spread (bearish) and a short put spread (bullish) that share the same short strikes. It’s entered as a credit, not a debit.
But here’s the thing: an iron butterfly with the same strikes as a long call or long put butterfly will produce the exact same risk, the exact same reward, and the exact same P&L curve. They are synthetically identical. The only difference is construction.
Think of the iron butterfly as an iron condor where the short strikes overlap. Same economics, different ticket.
0DTE Long Butterfly: Key Takeaways
- The 0DTE long butterfly is far more effective as a directional strategy than a market-neutral one
- Placing the butterfly out of the money transforms the risk-to-reward from unfavorable (~1:1) to favorable (1:9)
- Use symmetrical wings — broken-wing butterflies create profit curve dynamics that work against 0DTE trading
- Target a debit equal to one-tenth the spread width to achieve a 1:9 risk-to-reward
- A long call butterfly, a long put butterfly, and an iron butterfly with the same strikes all produce identical outcomes
- Enter soon after the open on 0DTE days, using the 50 EMA (or your preferred method) for directional bias
This article is based on the educational curriculum at Fly on the Wall. It is not financial advice. Options trading involves substantial risk of loss and is not appropriate for all investors.