


Options risk management is the single most important skill a trader can develop — and the one most traders ignore until it’s too late. Strategies get the attention. Greeks get the study sessions. But risk management is what determines whether you’re still trading next month or staring at a blown account wondering what happened.
Every experienced options trader will tell you the same thing: it’s not the winning trades that define your career, it’s how you handle the losses. The market doesn’t care about your thesis. It doesn’t care about your backtests. What it does care about is whether your position sizing, exposure limits, and structural choices can survive the moves you didn’t see coming.
This guide breaks down the practical framework for managing risk in options trading — from position-level controls to portfolio-wide discipline. Whether you trade 0DTE options or longer-dated contracts, these principles apply universally.
Why Options Risk Management Matters More Than Strategy Selection
New traders spend weeks researching the “best” options strategy. They compare iron condors to butterflies, debate debit spreads versus credit spreads, and chase setups that “work.” But here’s the uncomfortable truth: a mediocre strategy with excellent risk management will outperform a brilliant strategy with poor risk management every single time.
The reason is mathematical. Options are leveraged instruments. As the Options Clearing Corporation (OCC) emphasizes, understanding leverage is fundamental to risk management. A single unmanaged position can erase weeks or months of careful gains. Risk management isn’t a constraint on your trading — it’s the foundation that makes profitable trading possible in the first place.
Consider two traders running the same iron condor strategy. Trader A risks 5% of their account per trade with defined-risk structures and hard stops. Trader B risks 15% per trade with wider wings and no adjustment plan. After 50 trades, Trader A survives drawdowns and compounds gains. Trader B hits a streak of losses that mathematically eliminates any chance of recovery.
The strategy was identical. The risk management was not. That’s the difference.
The Five Pillars of Options Risk Management
Effective risk management in options trading isn’t a single rule — it’s a system of interconnected controls. Each pillar supports the others, and removing any one of them creates structural weakness.
1. Position Sizing: The Foundation of Survival
Position sizing is the most important risk management decision you make on every trade. It answers one question: how much of your account are you willing to lose if this trade goes completely wrong?
For options traders, this means calculating your maximum loss before entering the trade — not after. With defined-risk structures like vertical spreads, butterflies, and iron condors, your max loss is known at entry. This is a massive advantage over undefined-risk strategies where theoretical losses can be multiples of your initial margin.
Practical guidelines:
- Per-trade risk: 1-3% of total account equity. Never more than 5% on a single position.
- Daily risk limit: 5-10% of total account. If you hit this, stop trading for the day.
- Correlation risk: Three SPX butterflies isn’t three separate trades — it’s one directional bet. Size accordingly.
The math is straightforward. If you risk 2% per trade and lose five trades in a row (which will happen), you’ve lost roughly 10% of your account. That’s recoverable. If you risk 10% per trade and lose five in a row, you’ve lost 41% — and now you need a 70% gain just to break even.
2. Defined-Risk Structures: Know Your Worst Case
Every trade should have a defined maximum loss. This isn’t optional — it’s the structural prerequisite for everything else in your risk management framework.
Defined-risk options strategies include:
- Vertical spreads — both debit spreads and credit spreads cap your maximum loss at the width of the spread minus premium received/paid.
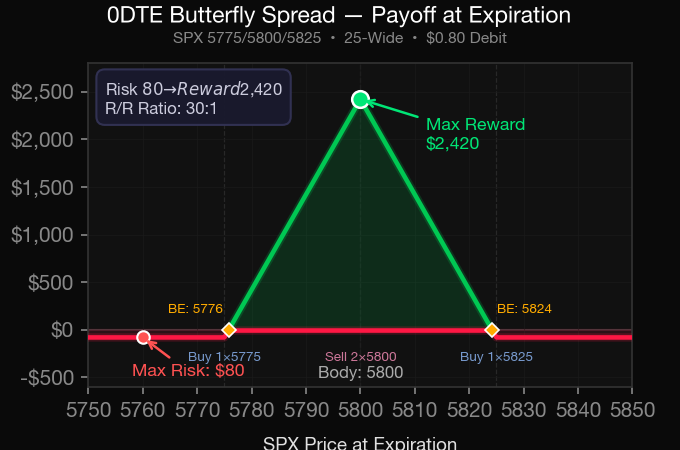
- Butterflies — long butterflies risk only the debit paid, making them inherently defined-risk with asymmetric upside.
- Iron condors — iron condors combine two credit spreads, with max loss defined by the wider wing minus total credit received.
- Iron butterflies — iron butterflies offer higher credit collection with defined risk at the wing width minus premium.
Undefined-risk strategies like naked puts, naked calls, or ratio spreads can work — but they require significantly more active management, higher margin, and a fundamentally different approach to position sizing. If you’re building a risk management framework, start with defined-risk structures and graduate to undefined risk only after you’ve proven discipline with the basics.
3. The Greeks as Risk Indicators
The options Greeks aren’t just pricing variables — they’re your real-time risk dashboard. Understanding what each Greek tells you about your exposure is essential for managing positions once they’re live.
Delta measures your directional exposure. A portfolio delta of +500 means you’re effectively long 500 shares of the underlying. If the market drops 10 points, you lose $5,000. Know your net delta at all times.
Gamma tells you how fast your delta is changing. High gamma positions (like at-the-money options near expiration) can see their directional exposure shift dramatically in minutes. This is especially critical for 0DTE trading where gamma exposure is at its peak.
Theta is your time decay — the premium you collect (or pay) each day. Risk managers use theta to understand their “daily rent” and whether the trade is earning enough to justify the risk being held.
Vega measures your exposure to implied volatility changes. An IV crush event can devastate a long vega position even if the underlying moves in your favor. Conversely, a volatility spike can blow up short vega trades that looked safe on paper.
4. Portfolio-Level Exposure Limits
Individual trade risk management is necessary but not sufficient. You also need portfolio-level controls that prevent correlated losses from compounding into catastrophe.
Key portfolio-level controls:
- Net delta limit: Cap your total portfolio delta relative to account size. A common guideline is keeping net delta under 10% of account value in notional terms.
- Sector concentration: Trading five different SPX options strategies isn’t diversification — it’s concentration. If SPX drops, they all lose together.
- Vega exposure cap: Know your total vega and what a 5-point IV swing would do to your portfolio. If the answer is “wipe out two months of gains,” you’re too heavy.
- Margin utilization: Never use more than 50-60% of available margin. The remaining buffer absorbs adverse moves without triggering forced liquidations.
- Correlation awareness: Positions that look independent on the surface (an SPX iron condor and a QQQ butterfly) are often highly correlated in a sell-off. Stress-test your portfolio for correlated moves, not just individual position outcomes.
5. The Expected Move Framework
The expected move is the market’s own estimate of how far the underlying is likely to travel within a given timeframe. It’s derived from implied volatility (as defined by the CBOE’s SPX options specifications) and gives you a statistical baseline for setting strikes, evaluating trade probability, and calibrating risk.
For risk management purposes, the expected move tells you:
- Where to place strikes: Selling options inside the expected move means you’re betting against the statistical consensus. That can work, but it requires understanding that the “expected” move is a one-standard-deviation estimate — meaning roughly 32% of the time, the actual move will exceed it.
- When risk is elevated: If implied volatility is high (expected move is wide), position sizes should shrink. The market is pricing in larger moves, and your risk per contract increases accordingly.
- Adjustment triggers: When the underlying approaches or breaches the expected move boundary, it’s a signal to evaluate your position — not necessarily to act, but to reassess whether your original thesis still holds.
Risk Management by Strategy Type
Different options strategies carry different risk profiles. Your risk management approach should be tailored to the specific structure you’re trading.
Credit Spreads and Iron Condors
Credit strategies collect premium upfront and profit from time decay and range-bound movement. The primary risk is a directional move through your short strike.
Risk management rules for credit strategies:
- Set a maximum loss exit at 2x the credit received. If you collected $1.00, close at $2.00 debit — no exceptions.
- Don’t “roll for credit” indefinitely. Each roll resets your risk and extends duration. Limit rolls to one per position.
- Watch delta. If your short strike’s delta exceeds 0.30, the probability of assignment or max loss is rising quickly.
- For iron condors, manage the tested side independently. Don’t let a profitable put spread blind you to a call spread that’s being breached.
Debit Spreads and Butterflies
Debit strategies pay premium upfront, with max loss limited to the debit paid. This makes position sizing straightforward — your max loss is your cost basis.
Risk management rules for debit strategies:
- Accept that most butterflies expire worthless. The asymmetric payoff means you lose small frequently and win big occasionally. This is by design.
- Never add to a losing butterfly to “average down.” Each trade should stand on its own merit.
- Set a time-based exit. If you’re trading 0DTE butterflies, have a latest exit time (e.g., 30 minutes before close) regardless of P&L.
- For debit spreads, take profits at 50-75% of max profit. Holding for the last 25% introduces significant gamma risk near expiration.
Straddles and Strangles
Volatility strategies like straddles and strangles bet on the magnitude of movement rather than direction. Risk management here focuses on volatility exposure and time decay.
Risk management rules for volatility strategies:
- For long straddles/strangles: set a maximum holding period. Theta decay accelerates daily — if the move hasn’t happened, exit before time decay consumes your premium.
- For short straddles/strangles: always have a defined exit point. A gamma squeeze or gap move can turn a profitable short strangle into a catastrophic loss within hours.
- Monitor vega carefully. A drop in IV (even without a price move) can make a long straddle lose money. Conversely, an IV spike can punish short volatility positions even if the underlying stays within range.
Common Risk Management Mistakes in Options Trading
Understanding what NOT to do is just as valuable as knowing the right framework. These mistakes account for the majority of blown accounts in options trading.
Oversizing after a winning streak. Confidence is the most dangerous emotion in trading. After five winning trades, the temptation is to “press” — increase size because you’re “feeling it.” This is precisely when risk management discipline matters most. The market doesn’t know you’ve been winning, and the next trade has no memory of the last one.
Ignoring correlation. Selling puts on five different tech stocks isn’t five independent trades. It’s one concentrated bet that technology doesn’t sell off. Portfolio-level risk means accounting for how positions move together under stress, not just in normal conditions.
Moving stops and adjustment points. If your plan says “exit at 2x loss,” then exit at 2x loss. Moving your stop once means you’ll move it again. And again. Until you’re staring at a position that’s consumed 20% of your account and praying for a reversal that isn’t coming.
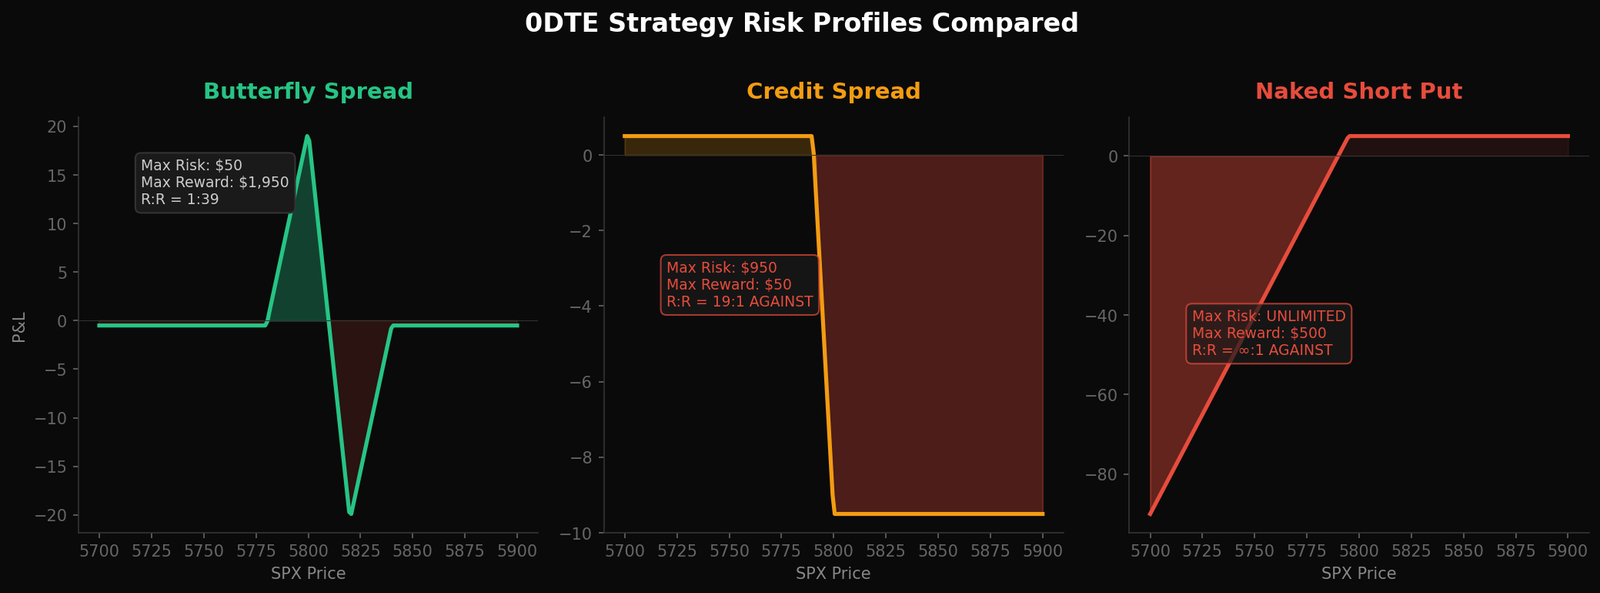
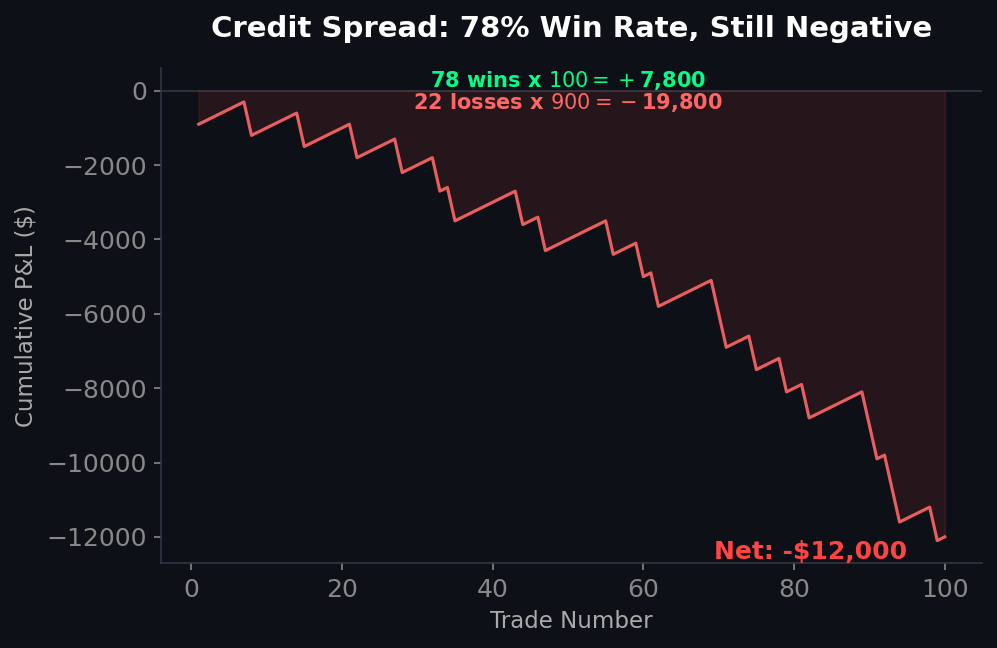
Confusing probability of profit with quality of risk. A trade with an 85% probability of profit sounds great — until you realize the 15% loss scenario wipes out six months of gains. Credit spreads and iron condors often have high win rates but deeply negative skew. Risk management means sizing for the loss scenario, not the win rate.
Revenge trading. Taking a loss and immediately entering a larger position to “make it back” is the single fastest way to destroy an account. If you’ve hit your daily loss limit, walk away. The market will be there tomorrow.
Building Your Options Risk Management Checklist
Before every trade, run through this checklist. Print it. Tape it to your monitor. Make it automatic.
- What is my maximum loss on this trade? If you can’t answer this in dollars, don’t enter the trade.
- Is this max loss within my per-trade risk limit (1-3% of account)? If not, reduce size or choose a different structure.
- What is my total portfolio delta after this trade? If it pushes you past your portfolio delta limit, reconsider.
- What is my total portfolio vega exposure? If an IV spike or crush would cause outsized damage, you’re too concentrated.
- What is my exit plan? Define both profit target and stop loss before entry. Write them down.
- Am I within my daily risk budget? If you’ve already lost your daily limit, stop.
- Am I trading from a plan, or from emotion? If the answer involves the words “should,” “feel,” or “make back,” close the platform.
Risk management isn’t about avoiding losses. Losses are an unavoidable cost of trading options. Risk management is about ensuring that no single loss — or series of losses — can end your career. It’s the discipline that transforms trading from gambling into a sustainable practice.
The traders who last in this market aren’t the ones with the best strategies. They’re the ones who managed their risk on every single trade, even when it felt unnecessary. Especially when it felt unnecessary.
Frequently Asked Questions
What is the most important rule of options risk management?
Position sizing. No matter how good your strategy is, risking too much on any single trade can lead to unrecoverable losses. Keep per-trade risk between 1-3% of your total account equity, and never exceed 5% on a single position. This ensures that even a string of consecutive losses won’t knock you out of the game.
How do I calculate my maximum loss on an options trade?
For defined-risk strategies like vertical spreads, butterflies, and iron condors, your maximum loss is calculated at entry. For a credit spread, it’s the width of the strikes minus the premium received, multiplied by the number of contracts. For a debit spread or butterfly, it’s simply the premium paid. Always calculate this number before entering any trade.
Should I use stop losses on options positions?
Yes, but with nuance. Hard stop-loss orders on options can be triggered by temporary bid-ask spread widening or brief volatility spikes. Instead of hard stops, most experienced options traders use “mental stops” — predefined loss levels where they commit to manually closing the position. The key is having the discipline to actually execute when the level is hit.
How much of my portfolio should be in options at one time?
A common guideline is to keep no more than 50-60% of your margin in use at any time. This leaves buffer for adverse moves and prevents forced liquidations. Additionally, monitor your total portfolio vega and delta to ensure you’re not inadvertently overexposed to a single direction or volatility shift.
What’s the difference between trade-level and portfolio-level risk management?
Trade-level risk management controls the size and structure of individual positions — how much you risk per trade, where your stops are, and when you exit. Portfolio-level risk management looks at how all your positions interact — total directional exposure, correlation between positions, aggregate vega, and overall margin utilization. Both are essential. You can manage every individual trade perfectly and still blow up if your portfolio-level exposure is too concentrated.